
E. Carroll Hale II, PROFESSOR EMERITUS
FORMER Area Coordinator, Sculpture
Department of Art and Design, Eastern Kentucky University
STEPS ALONG THE WAY TO COMPLETION OF A SCULPTURAL COMMISSION
1. Here are the 24"H maquettes. (St. Peter is in front with the staff.) The maquettes are made of plastilene (oil-based) clay over a metal armature. I was not satisfied with St. Paul and did another maquette before submitting the pair to the parish committee for possible acceptance.


2. This is the maquette of St. Peter as it was presented to the commitee for the first time.
3. The committee decided that St. Peter looked too much like a conquistador and NOT a saint. Responding to their suggestions, I modified the maquette to this form (which they accepted).
4. This is the St. Paul maquette presented to the committee. Note the sword lying on the base in front of St. Paul and the scroll behind him. These are iconographic symbols associated with St. Paul and had to be included. Exactly how they were going to fit in the overall composition had not yet been decided.
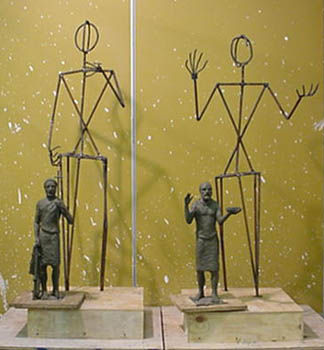
5. After the committee decided that St. Paul would hold the scroll in his left hand, initial acceptance of the maquettes was complete and work could begin on the full-size sculptures. Here the maquettes are shown in front of the armatures for the full-size works. Scaling-up was accomplished by taking measurements from the maquettes and multiplying them by an appropriate factor.
In February, 2000, I was approached regarding the production of sculptures of St. Peter and St. Paul for the parish of Sts. Peter and Paul, Danville, KY. After a good bit of correspondence with Father Paul Prabell (the pastor), two or three visits to the church, and substantial research into the appearance of the saints, I produced a pair of maquettes. (A maquette is a small three-dimensional sketch - that is, a preliminary study.) The maquettes were presented to a parish committee for their examination. They suggested a few changes. After I made changes the maquettes were approved, and work on the full-scale sculptures commenced. Over the course of the better part of a year, with some back-and- forth committee consultation, the full-scale clay sculptures were approved, molds were made and the resulting fiberglass casts were installed in the church. I hope the photographs below will provide you with a sense of what it takes to bring a commission like this to a successful completion.
6. The armatures would weigh a great deal if they were solidly filled in with plastilene. Therefore, it's good practice to" bulk them up" by filling the interior with some lightweight material. In this case, styrofoam is the material of choice for most of the torso with spray foam used as an adhesive and filler. This is St. Paul's torso partially filled in.
7. This is the St. Peter armature in the process of being filled-in.
8. The start of covering the armatures with plastilene. Patrick (who is applying the plastilene) is about 6' tall. Note how small the figure of St. Paul appears in relationship to Patrick. The statue of St. Paul is actually life-size. According to biblical accounts he was "a man of three cubits" - that is, 4'6". I had originally made the armature for St. Peter about 5'5". The disparity in size made the group look like a man and a boy. As a result, I shrank St. Peter to about 5'.


9. Here are both figures with a rough coat of plastilene. Patrick gives a sense of scale.
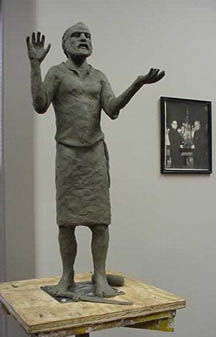
10. Profile view of St. Paul. The surfaces are still rough. I usually work out the anatomy of the head before adding hair. The committee wanted St. Paul to be expressive and intense.
11. Three-quarter view of St. Peter. The committee wanted him to be more of a solid. steady, type than St. Paul.
12. A comparision of St. Peter and St. Paul at an intermediate state.

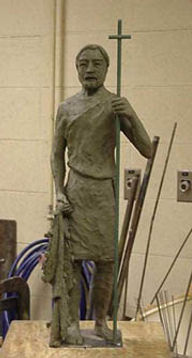
13. Here's St. Peter in an almost finished state. The armature for his fishnet is not yet covered and his sandals are incomplete. His staff will be fabricated later.

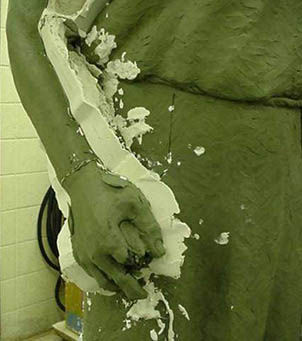
14. St. Paul in a mostly finished state. The sword isn't in place, but it's ready.

15. Sts. Peter and Paul together in the approximate relationship they will be when cast. They're ready for final approval by the committee before being cast. After consultation, the committee decided to have the sword placed in the ground in front of Paul. They also wanted a flap from St. Paul's scroll to extend partway back down his arm.

16. St. Peter (close-up).
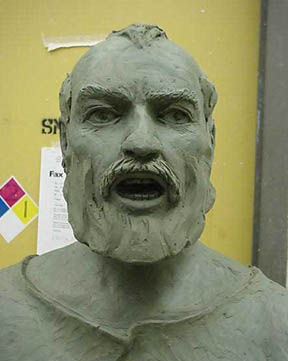
17. St. Paul (close-up).


18. The molding process begins. St. Paul is wrapped in plastic to keep the plaster mold material off the parts not ready for molding. I decided to make molds of the arms first and then detach them so I would have easy access to the rest of the figure. I followed this approach on both figures. Note that the scroll has been removed - it was cast separately.
19. St. Peter's arm divided by shims. This allows the parts of the mold to be easily separated and removed from the figure. Both Figures required about thirty-five mold sections.
20. St. Peter's net has already been molded and has been removed. Now, the arm is in the process of having its mold stripped away.


21. St. Peter with his arms removed and his legs already encased in molding.
22. Putting finishing touches on a completed mold. Note the reinforcing rod custom fit to each mold section. The rod is attached with pieces of burlap dipped in plaster. Besides providing reinforcing, the rods also serve as convenient handles.
23. Michael in the process of "laying-up" glass mat and resin in a mold section. Note the organic vapor respirator, the rubber gloves and the apron - all are necessary.
24. An overhead view of the "lay-up" process.

25. A stack of mold pieces that have had two layers of gel-coat and three layers of mat applied.
26. A row of some of the larger mold pieces.
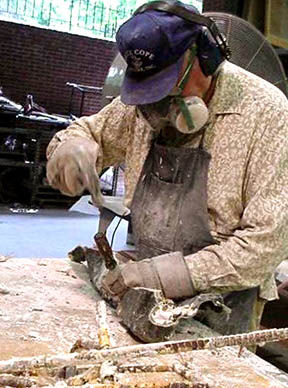
27. Michael using a pneumatic "muffler-cutter" to cut reinfocing rod away from the plaster parts of the mold.
28. Cutting the overlap away from the edges of the mold so the sections will align properly.
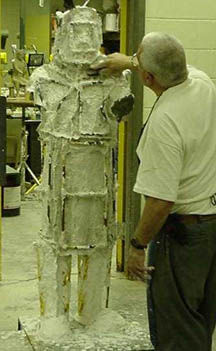
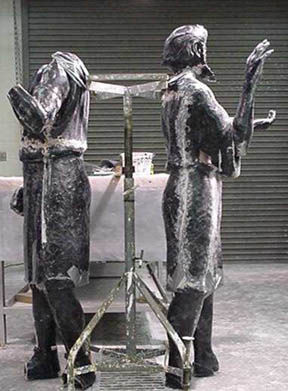
29. Breaking the plaster mold away from the cast fiberglass sections. The fiberglass is tough and somewhat flexible which allows most of the mold to be broken away in a fairly brutal fashion. Obviously care has to be taken around delicate or highly detailed sections.
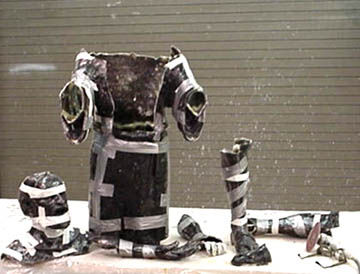
30. Five sections of the cast taped together in proper alignment prepatory to sealing them together with mat and resin from the inside.


31. Sections of the St. Paul figure taped into sub-assemblies that, once sealed, will be joined to make the entire figure.
32. View into the interior of a figure's lower half after it has been assembled and before reinforcing has been placed in the legs.
33. Here the figures are mostly assembled. They are taped to a sculpture stand to keep them stabile during further assembly. Some of the external gaps in the seams have already been filled with Bondo (auto repair putty). Bondo is very useful for repairing all sorts of surface defects.
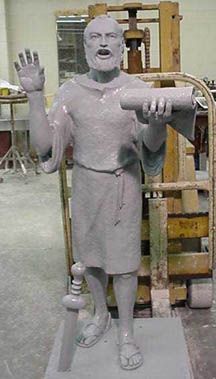
34. St. Peter has been completely assembled and is bolted to a temporary stand. All seam gaps an other imperfections have been filled and surfaced.
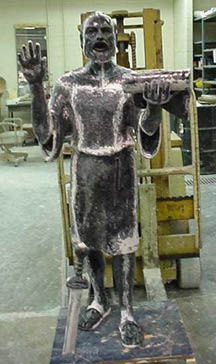
35. St. Peter after being given a coat of primer.
36. St. Paul fully assembled and surfaced. Note the sword which is placed as though stuck in the ground at his feet.
37. St. Paul in a "not quite dry" coat of primer.
38. The completed fiberglass casts in front of the original plasticene sculptures. This state took about a year of "spare" time to arrive at.
39. Sts. Peter and Paul in the patina chosen by the committee. This is the second patina given the statues - the first patina chosen did not fit in well with the overall ambiance of the church.
I'm a paragraph. Click here to add your own text and edit me. It's easy.
40. A view of the interior of Sts. Peter and Paul Church with the statues in place.