
E. Carroll Hale II, PROFESSOR EMERITUS
FORMER Area Coordinator, Sculpture
Department of Art and Design, Eastern Kentucky University


THIS SERIES OF PHOTOS ILLUSTRATES STEPS TAKEN TO CAST A SCULPTURE IN BRONZE FROM THE POINT OF BURN-OUT TO FINISHED WORK.
Most of the photos in this sequence were taken from a variety of casting projects.
However, all, from whatever project, refer accurately to the overall process.
The pattern has been encased in a material called "investment". The investment will be heated at approximately 1,100 degrees f. The interior of the investment must reach a temperature of approximately 900 degrees f. to insure that wax and any other materials in the pattern will be completely burned-out. That leaves a hollow space in the investment that is a negative of the pattern. Bronze poured into the investment will take the shape of the pattern.
SAFETY NOTE: If any wax or otherwise flammable material were to remain in the interior of the investment, when the 2,000 degree f. molten bronze is poured into the investment, an explosive reaction will occur. The immediate result will be the ejection of slugs of molten bronze (like a blast from a shotgun!) that can cause serious injuries.
Some of the wax patterns in the examples shown below (for instance, heads) are hollow, they will have an interior core of investment to prevent them from casting as a solid lump. Other patterns, like the bayonet (also below) are solid. All go through the same basic steps, but removing a core is more difficult than simply cleaning away an outer surface.
BRONZE CASTING
Burn-Out and Casting
N.B., It is assumed that you've already read the "BRONZE CASTING (A Brief Overview"Overview" and "BRONZE CASTING, Investing the Wax" available at this site.
The investment has been packed in this kiln and has been kept at about 1,100 degrees f. for three days. After the kiln is shut off, it is allowed to cool for about six hours at which point the interior is at about 500 or 600 degrees. The kiln is then opened. This particular kiln is a "car" kiln and is opened by rolling the interior platform out on tracks.
The car has been rolled out and the investments are being cleaned (vacuumed) of any investment crumbs or other trash to prevent contamination of the casts. Note the protective clothing - those investments are HOT! That bald head (below) is shiny from sweat!
The investments (also called molds) are carefully removed from the kiln. If they were to be jarred or crushed, even slightly, interior mold parts might be broken out of place. Depending on the weight of an investment, it might be simply moved by hand, but some require a hoist or a forklift.

The investments are placed in a sand pit so that their tops are at about floor level - this makes pouring considerably safer and easier. They are arranged so that the shank crew can approach each safely. The investments are then surrounded by flasks and packed in sand to contain any possible break-outs of molten metal. Investment tops are kept covered to keep any sand from entering the mold cavity. When each is ready for a pour, it is uncovered.
MEANWHILE . . .
As the investments are being placed in the pit, other members of the casting crew are preparing to melt bronze.
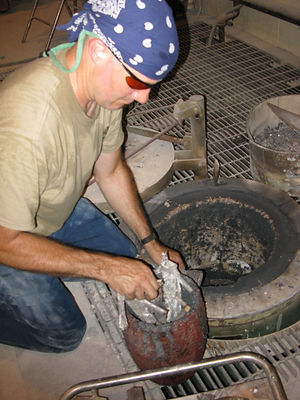
CHARGING THE CRUCIBLE - Small pieces of scrap from previous casting sessions are placed in the crucible before it's put in the furnace. This is done because everything is cool and the scrap is easier to handle this way than with blacksmiths' tongs. The filled crucible is lowered into the furnace using the crucible tongs that will lift it later when the bronze is melted.


The furnace is lit and set to burn with a neutral or slightly carburizing flame to avoid oxidizing the melted bronze. As the initial charge of bronze melts the individual pieces consolidate and leave more space in the crucible. Additional pieces of scrap and fresh ingots are added as melting proceeds. All metal added to a melt MUST be preheated to insure there is no moisture present in the metal. If moisture were to be present, it would cause a dangerous explosion.
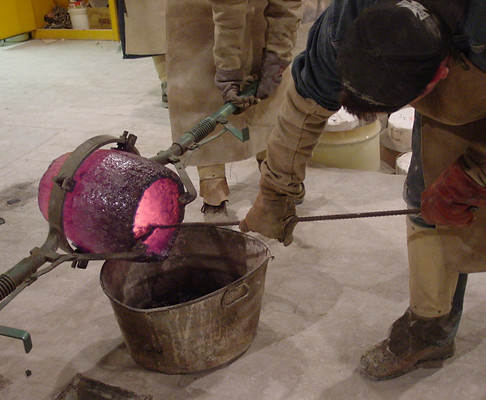
As melting proceeds the surface of the melt is skimmed to remove impurities (slag, also called dross) to insure good metal in the cast.
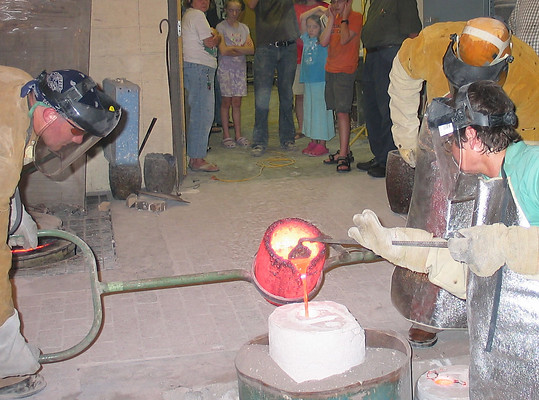
The crucible of melted bronze is lifted from the furnace by the pouring crew and placed in the shank. There is a crew member - the "skimmer" (standing just out of this photo's range) - who will step forward and steady the crucible as the tongs are removed and the pouring shank is locked to the crucible. There is a member of the crew waiting to take the tongs from the pouring crew. Larger crucibles are lifted with an overhead hoist.
Note that the foundry is arranged so that the tops of the furnaces are at floor level as are the tops of the investments. This allows the casting to proceed without the crucible having to be raised more than a little above the floor. This is much safer than having to raise the crucible three or four feet above the floor.
A Pour in Progress: The first photograph shows the "skimmer" in position to brush back any slag that may remain in the crucible. The "skimmer" is actually in charge of the pouring crew. She has directed the shank crew in the placement of the crucible for an accurate pour, the rate of pour, and its duration. The second photograph is an illustration of the use of a hoist and bail when a large (300 lbs. total weight) crucible is in use.

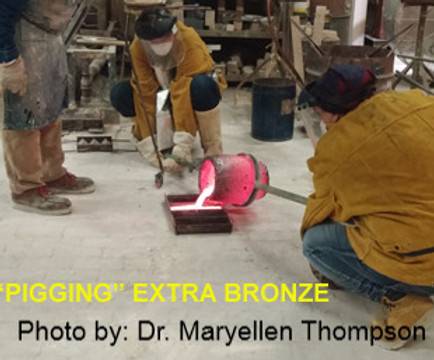
After the pour, any bronze left in the crucible is poured into "pig" molds. The interior of the crucible is scraped and any slag broken loose is disposed of. This tub is also where slag skimmed from the molten bronze is put.
COOLING THE CASTS
The casts are left to sit for several hours. Bronze, unlike iron, does not become malleable when very hot. Rather, it behaves somewhat like hard cheese and fractures or crumbles when struck. Therefore, it's a good idea to let it drop in temperature to 400 or 500 degrees f. Since we usually cast in the late evening, this means that, in practice, the investments are left in the pit at least overnight.

Large investments are usually removed from the pit using an overhead hoist. A choke cable is fitted around the investment and it is hoisted up and away to an open area of the foundry floor. Smaller investments are simply lifted out.

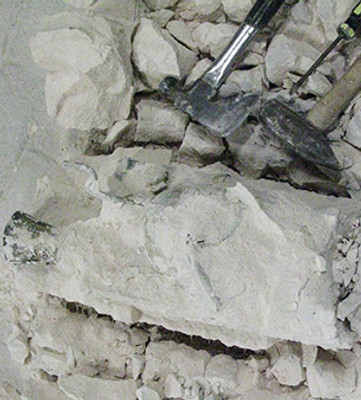
The first step in releasing the cast from its investment is to cut the wire surrounding the investment. In the first photograph this is being done (carefully) with a hatchet - this also creates a fissure. The second step is to hammer on the pouring cup to break-out the cast - sometimes it is necessary to hammer on other parts of the gating system as well.
After the cast is mostly broken out, as much as possible of the remaining investment is picked away with tools like the screwdriver shown above. Care must be taken to not scar the surface of the cast.


Remaining investment is removed with a power washer. In the past a sandblaster was used for this step, but it was difficult to use safely and was more expensive. The power washer is just as effective, is faster to use, and is much safer.
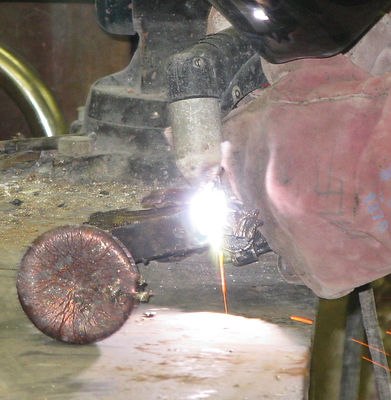
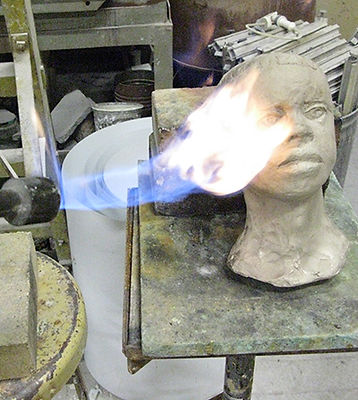
The gating (sprue) system is removed next. This task consists of cutting loose all gates and vents. A variety of tools may be used to do the cutting. Disc grinders and saws are often used, but if a plasma cutter is available, use it. A plasma cutter is far faster than the other tools and much easier to use.
In the photograph of tools above, you can see a head imprisoned by its gating system and note the difficulty of bringing standard cutting tools to bear on it for clean, close (less wasteful) cuts. In the other photograph the plasma torch is easily cutting some of the thicker elements of the gating system.
The student in the left photograph is using a disc cutter because she feels she can control it better than a plasma cutter. Note that she has two sculptures on one gating system.
No matter what cutting system one chooses, the stubs left by the gates and vents, and various casting imperfections remain to be dealt with. For example, each of the stubs on the bayonet above will have to be ground back to the original surface and the grinding marks then removed to match the character and texture of the original surface.
Above is a selection tools used to surface bronze casts. Grinders, cutters, wire and/or cloth buffs, all are used.
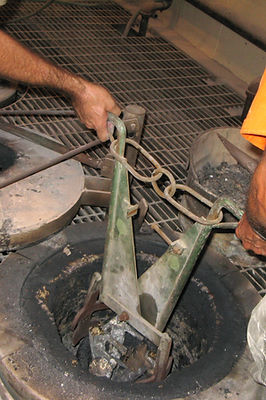
The bayonet and rifle fore-end are ready to be pickled. That is, they will be soaked in a mild sulfuric acid solution to remove fire scale. Pickling is sometimes skipped if the fire scale is more easily removed by other ways.
Besides grinding and filing, much of the clean-up of casts involves chisel work. It doesn't matter how small or large the cast, there will be surface defects that are best dealt with by the use of chisels.
Two important tools not shown here are the TIG (HeliArc) welder and the sand blaster. On the dog above there are a number of holes where core pins were - these have been closed by TIG welding. The head on the left (below) has been sandblasted to unify its surface texture and to open-up the surface preparatory to treating it with chemicals.
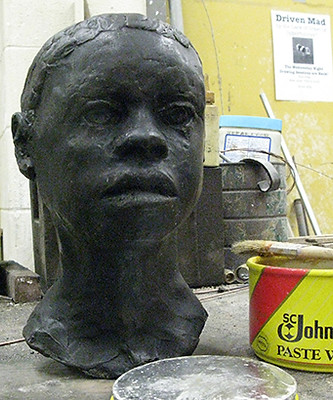
Patination is the coloration of bronze. There are many forms of patinas: some are natural - a sculpture is exposed to the weather or buried in the earth and its color changes; others are artificial - a sculpture is treated with the application of chemicals to give it a desired color. Strictly speaking, any means of coloring sculpture is patination.
Here a bronze cast has been sandblasted and is being heated to make the chemical solution work quickly. In this case a solution of liver of sulphur (a form of potassium sulphide), is brushed over the bronze causing it to turn a dark brown almost immediately. The resulting patina is not very consistent in its effect (see below). Later, other chemicals will be applied in order to achieve a specific color.
The first applications of patina chemicals usually result in blotchy, uneven, surface colors. Also, some patinas, like those caused by liver of sulphur, are not "tight". That is they wipe off somewhat easily. Usually additional chemicals are subsequently applied. In the series above, The first image's color is the result of a heavy application of liver of sulphur after it has dried. The second image shows the effects of several applications with intermittent washing. The third image has been treated with several applications of a ferric nitrate solution over the liver of sulphur applications. This has resulted in a tight, even, dark brown patina. Lastly, the head will be waxed and buffed as a protective finish. Green patinas resulting from chemicals like cupric nitrate are usually not waxed unless an dark olive green is desired.
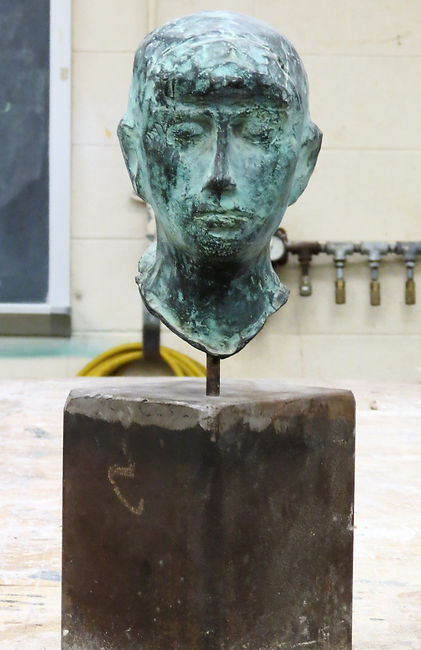
Here are two completed bronze casts with two very different patinas. The cast on the right has additions made of iron. Below is a rifle fore-end and bayonet welded together ready for installation on a WW I Doughboy statue that had been vandalized.
Regarding the sculpture above on the right: “Cause”
This piece was in the exhibition, Reverberations of the Civil War.
“Cause” started life as a demonstration piece for a class project centering on the human bust. It was used again as an example demonstrating how to cast a hollow form in bronze. Somehow, it suggested to me an image dealing with slavery. Adding the iron collar and chain completed the image and resulted in the work before you as a commentary on the sources of our most horrible war.
