
E. Carroll Hale II, PROFESSOR EMERITUS
FORMER Area Coordinator, Sculpture
Department of Art and Design, Eastern Kentucky University
FIBERGLASS CASTING
(Short Form)
What follows is a process based on waste molding. It is assumed that the reader already knows how to model in clay (or whatever), make an appropriate plaster mold from the original, and remove the mold. It is further assumed that the reader knows how to make and release a plaster cast from such a mold. Further, it is assumed that you have a source for materials like fiberglasssite.com or advanced-plastics.com.
BEFORE YOU START
For safety's sake you MUST secure a workspace that can be ventilated (by
forced draft) to the outside. Further, if you share a building with other
people, you must take proper precautions to keep the fumes from infiltrating
the rest of the structure. The reason is obvious! If you have pets, do not
allow them to breathe the fumes - I believe birds are especially sensitive.
Equipment/Facilities:
Exhaust fan (large)
Work table(s)
Sink with hot and cold running water
Trash can(s)
Electrical service - if possible, pneumatic service or an air compressor
Other equipment or tools will be listed as it is needed
STARTING
Once the plaster mold has been made, cleaned, and dried. . .
STEP ONE: SEALING THE MOLD
Supplies/Materials:
Brush
Shellac
Denatured alcohol
A can or cup to clean the brush in
Seal the mold's casting surfaces with shellac. Use three-pound cut shellac.
Amber shellac makes it easier to judge whether or not you have good coverage. You'll probably need at least two coats to completely seal the mold (three are usually better). When the mold surface gains a sheen (when it's dry) it's sealed. Don't put on more shellac than necessary or you'll lose detail.
Remember to seal the edges of the mold as well as the casting surfaces. Clean
the brush.
STEP TWO: WAXING THE MOLD
Supplies/Materials:
Johnson's Paste Wax or Partall Wax
1" or 1 «" wide brush - chinese bristle
soft cloths (toweling)
Coat the sealed mold with two layers of paste wax or the special "Partall"
brand wax. Liberally brush the wax over the sealed areas of the mold. Let it
set and them buff very lightly with a soft cloth. When buffing, be careful to
avoid breaking off fragile details of the mold. Clean your tools.
WEAR AN ORGANIC VAPOR RESPIRATOR AND EYE PROTECTION FOR ALL REMAINING PROCESSES
STEP THREE: APPLICATION OF PARTING COMPOUND TO THE MOLD
Supplies/Materials:
Respirator
Eye shield or safety glasses
Partall liquid
Spray gun or brush
Denatured alcohol for cleanup
After the mold has been sealed and waxed, it should be coated with a layer of
liquid polyvinyl alcohol - trade name Partall. This is best done by spraying
on one or two thin layers. However, if spraying isn't feasible, the Partall
may be brushed on. The Partall is tinted green. When your mold has a
definite green cast, the Partall is thick enough. Let the Partall dry
thoroughly before applying resin to the mold. Clean your tools (the spray gun
must be cleaned immediately).
IN ADDITION TO THE RESPIRATOR AND EYE PROTECTION YOU MUST NOW WEAR RESIN PROOF RUBBER GLOVES. (IT IS ALSO A GOOD IDEA TO WEAR A CAP, LONG PANTS, A LONG-SLEEVED SHIRT AND AN APRON MADE OF CLOSELY WOVEN MATERIAL [e.g. DENIM]. THIS CLOTHING IS TO BE WORN THROUGHOUT THE PROJECT AND DISCARDED AT ITS COMPLETION.)
STEP FOUR: APPLYING THE GELCOAT
Supplies/Materials:
Respirator
Eye shield or safety glasses
Gloves
Gelcoat (resin)
Catalyst (Hardener)
Chinese bristle brush, 1" or 1 «"
Acetone for cleanup
Measuring cup
Plastic mixing bowls
Mixing paddles
Six Mil Plastic Sheeting
Your work surface should be covered with heavy (six mil) plastic sheeting.
The start of the actual cast itself, is the laying in of the gelcoat.
Catalyze and thoroughly mix a batch of gelcoat resin. Follow the
manufacturer's directions regarding catalyst to resin ratios. (FYI, The
gelcoat has pigment incorporated and usually needs about twice the ratio of
catalyst to resin as the resin used for bonding the fiberglass mat/cloth.) If
you're working alone, don't mix more than about eight ounces of resin at a
time until you get the hang of things. "Throwaway" plastic bowls are useful
for mixing. Don't use foam cups - they will dissolve immediately! Using a
chinese bristle brush, coat the mold with a layer of gelcoat. The gelcoat
will thicken as it starts to set - don't try to use it once it starts to gel.
Repeat this process for a second coat. If the mold has overhangs or undercuts
that didn't receive a good layer during the first coat, reorient the mold (if
possible) so that they are well covered during the second coat.
STEP FIVE: LAYUP WITH MAT AND RESIN
Supplies/Materials:
Respirator
Eye shield or safety glasses
Gloves
Resin
Fiberglass Mat or Cloth 1 1/2 oz. weight.
Scissors
Catalyst (Hardener)
Chinese bristle brush, 1" or 1 1/2"
Acetone for cleanup
Measuring cup
Plastic mixing bowls (e.g. cottage cheese/yogurt containers)
Mixing paddles
Six Mil Plastic Sheeting
After the gelcoat layers have set, you may start the layup of fiberglass mat
or cloth. (For purposes of brevity, I'll simply refer to mat.) Cut the mat
into manageable pieces ahead of time. Catalyze and mix a batch of resin (8
oz. to start). You can saturate the mat prior to placing it in the mold or you
can coat the mold with resin, lay in the mat, and saturate it in place. Use
your brush to make the mat conform to the surfaces of the mold and eliminate any air pockets. "Shingle" the pieces of mat by overlapping. After you've covered the mold with one layer, go back over it twice again for a total of three layers. When your brush is not in use, it should have the bristle
portion immersed in acetone. The acetone can should be kept covered.
STEP FIVE: DEVESTING
Supplies/Materials:
Respirator
Eye shield or safety glasses
Gloves
Grinder/Sander
Coarse discs for the grinder or sander
Optional: "Muffler-Cutter" (very handy)
Hammer
Common Screwdriver (1/4" - 1/2")
Set of dental picks or similar tools
Scrub brush or bronze brush
Garden hose with spray nozzle
Optional: Power-Washer
Rags/Toweling
Carpet
After layup is complete and the last coat of resin/mat has completely cured,
the cast sections are separated from the mold pieces. Separation starts with
each section being cleaned back the in to the parting edges of the mold. This
is done by grinding or cutting away the waste edges where the resin/mat has
overlapped the margins of the mold pieces. Usually, it is a good idea to
grind a slight inwards bevel on the edges of the cast sections.
YOU MAY REMOVE YOUR RESPIRATOR FOR THE REMAINDER OF STEP FIVE
When all the sections have been 'cleaned back", the next phase begins. The
mold sections are placed on a cushioned surface (rags and/or carpet) and are
broken by judicious use of the hammer and screwdriver. Here you follow
procedures much like those associated with waste-molding a plaster cast.
However, you don't have to be as gentle as is necessary with plaster.
Fiberglass is much, much tougher than plaster. Since it is flexible, there is
little chance of it breaking. Simple shapes often can be released by striking
the mold a whack or two. Complex shapes are not so easily released and the
mold sections have to be removed piecemeal. Textured areas quite often force the sculptor to resort to dental picks etc.
After the plaster has been mostly removed from the fiberglass sections, (they
will still have bits and pieces of plaster stuck here and there) it's time to
remove the partall film. Use the hose and spray nozzle or a power washer
with warm water to blast away the partall (some plaster will come away too).
Some areas will require additional scrubbing with rags and scrub/bronze
brushes and further rinsing. (THIS PART OF THE JOB IS BEST DONE UTDOORS IF POSSIBLE.) After washing, scrubbing, picking, washing some more and so on, the cleaned fiberglass sections should be dried completely.
STEP SIX: ASSEMBLY
Supplies/Materials:
Respirator
Eye shield or safety glasses
Gloves
Resin
Fiberglass Mat or Cloth 1 « oz weight.
Scissors
Catalyst (Hardener)
Chinese bristle brush, 1" or 1 1/2"
Acetone for cleanup
Measuring cup
Plastic mixing bowls (e.g. cottage cheese/yogurt containers)
Mixing paddles
Six Mil Plastic Sheeting
Duct tape/masking tape
Grinder/Sanders
Files, rasps, sandpaper
Discs for grinders or sanders
Bondo" auto body filler with hardener (optional)
(Yes, you have to wear your respirator for this too!)
Fit the fiberglass sections together in manageable assemblies by taping
together however many parts you will be able to reach into and "glue" together with pieces of resin-soaked mat. This is a one of the trickiest parts of the whole enterprise because it is possible to leave yourself with no way of
easily getting inside the form to do the necessary "gluing". Since every new
sculpture presents a new set of problems, you'll have to figure out your
approach to taping for yourself. A general rule that may help is to assemble
and tape from the outer forms to the inner and from one end to the other. Be
sure to think through your sequence BEFORE you start. The seams need to be
layered to the same thickness as the rest of the cast. E.G., if the cast is
three layers thick, the taping will be three layers thick. Once the cast is
assembled, Surface defects are sanded and filed or filled as necessary. If
the cast is to be painted, gaps in the outer surface of the seams may be
filled with "Bondo" auto body filler. If the surface is to be the fiberglass
itself, fill in any gaps with gelcoat (this may require several applications
since the gelcoat isn't particularly thixotropic).
Good Luck
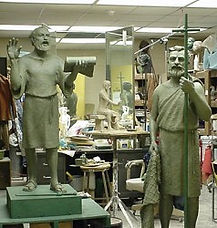
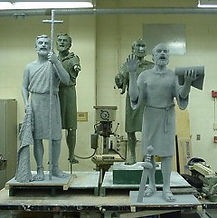
Here are examples of two sculptures (St Peter with the cross and St. Paul with the scroll). The image on the left shows them in their clay (plastilene) state prior to mold-making and casting. The image on the right show the resulting fiberglass casts, primed for painting, in front of the originals.
The section of this website titled "Steps To A Commission" has additional information re. fiberglass casting.